Overview
This app is designed to help train an AI model by collecting labeled data. The app will show random images (apples and pears for now), and your task is to label them by selecting the correct option. Your input will help improve the AI’s ability to recognize and classify images.
Stack Diagram
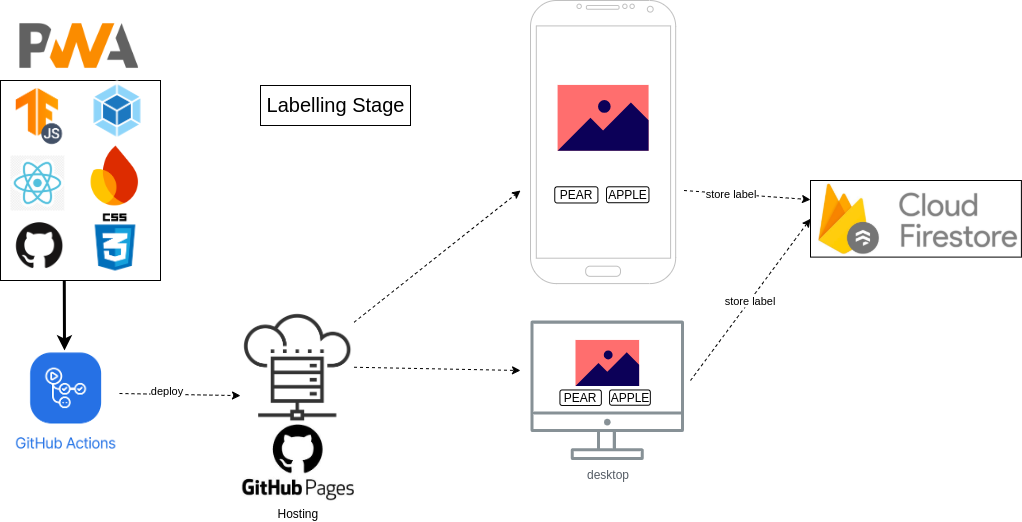
Frontend Stack
- React:
- Used for building the user interface and managing the component-based architecture.
- Version:
^18.0.0(as per current package.json).
- CSS:
- Custom CSS for styling components.
- Flexbox is used for layout and responsiveness.
- Webpack:
- Used as the module bundler to bundle JavaScript, CSS, and other assets.
- Configured for both development and production environments.
- TensorFlow.js:
- Library:
@tensorflow/tfjsand@tensorflow-models/mobilenet. - Used for extracting image features with the MobileNet model.
- Firebase:
- Firebase Firestore is used for saving feedback data.
- Firebase configuration is managed via .env files.
- GitHub Pages:
- Used for hosting the frontend as a static Progressive Web App (PWA).
Backend Stack
Firebase Firestore:
- A NoSQL cloud database used for storing feedback data.
- Firestore rules are configured to manage read/write access.
GitHub Pages:
- GitHub Pages for hosting the app.
Development Tools
Node.js:
- Used for managing dependencies and running scripts (e.g.,
npm run build,npm run deploy).
npm:
- Package manager for installing and managing project dependencies.
ESLint:
- Used for linting JavaScript code (as per the
lintscript in package.json).
gh-pages:
- A Node.js package used to deploy the app to GitHub Pages.
Summary
- Frontend: React, CSS, TensorFlow.js, Webpack, Firebase, GitHub Pages.
- Backend: Firebase Firestore.
- Development Tools: Node.js, npm, ESLint, gh-pages.
User Guide: How to Use the App
Here’s a simple user guide to describe how the app works. This guide is written from the perspective of a user interacting with the app.
Step-by-Step Instructions
1. Open the App
- Visit the app’s URL:
https://josesuarezcordova.github.io/pwa_app/- The app will load a screen with the title “Help Us Teach the AI”.
2. Understand the Layout
- At the top of the screen, you’ll see the title: “Help Us Teach the AI”.
- Below the title, a random image will be displayed.
- At the bottom of the screen, there are two buttons labeled “Pears” and “Apple”.
3. Label the Image
- Look at the image displayed on the screen.
- Decide whether the image is a Pear or an Apple.
- Click the corresponding button:
- Click “Pears” if the image is a pear.
- Click “Apple” if the image is an apple.
4. What Happens Next
- After you click a button:
- Your selection is saved to the database (Firestore).
- A confirmation message may appear (e.g., “You selected ‘Pear'”).
- The app reloads and displays a new random image for labeling.
5. Repeat the Process
- Continue labeling images by selecting the correct option for each one.
- Your input will help gather data to train the AI model.
Tips for Using the App
Be Accurate:
- Try to label the images as accurately as possible to ensure high-quality training data for the AI.
Use a Stable Internet Connection:
- The app saves your input to the cloud, so a stable internet connection is required.
Mobile and Desktop Friendly:
- The app works on both mobile devices and desktop browsers. On mobile, ensure the image fits the screen properly.
Troubleshooting
If you encounter any issues while using the app:
The Image Doesn’t Load:
- Refresh the page or check your internet connection.
The Buttons Don’t Work:
- Ensure your browser supports JavaScript and try again.
Error Messages:
- If you see an error message, contact the app developer with details of the issue.
Future Features
- In the next stage of the app, the AI will use the labeled data to predict the label of new images. Stay tuned for updates!
This guide should help users understand how to interact with the app and its purpose.
Comments are closed