The Problem
Our healthcare platform helps patients manage their weight loss journey. Part of this includes prescriptions — doctors write them, and patients send them to their pharmacy.
The system worked well for one region using email-based prescriptions. But when we expanded to a new region, we needed a different approach. The new region required legally compliant electronic prescriptions — sending a PDF by email was not enough.
We needed to integrate with a third-party e-prescription platform that handles the legal requirements, digital signatures, and pharmacy notifications.
The Solution
We added a region selector to the patient app. Depending on the patient’s location:
- Region A — existing email flow (unchanged)
- Region B — electronic prescription via a third-party API
The patient searches for their pharmacy from a curated list, selects it, and clicks send. The rest happens automatically — the prescription is signed, the pharmacy gets notified, and the patient sees a confirmation.
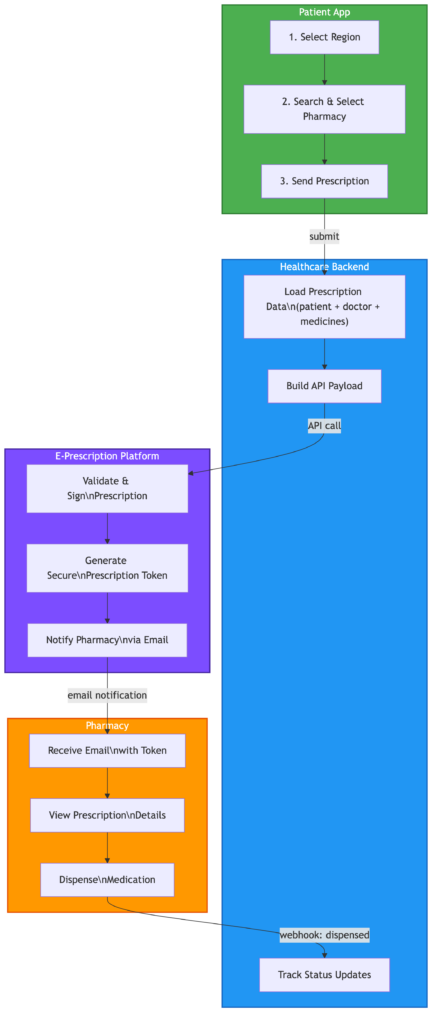
How It Works
Here is the high-level flow:
- Patient App — selects region, searches pharmacy, sends prescription
- Our Backend — loads prescription, doctor, and patient data, builds the API payload, sends to the e-prescription platform
- E-Prescription Platform — validates and signs the prescription, notifies the pharmacy by email with a secure token
- Pharmacy — receives the email, opens the prescription using the token, dispenses the medication, marks as dispensed
- Webhook — the platform sends a status update back to our system, our database updates automatically (signed to dispensed)
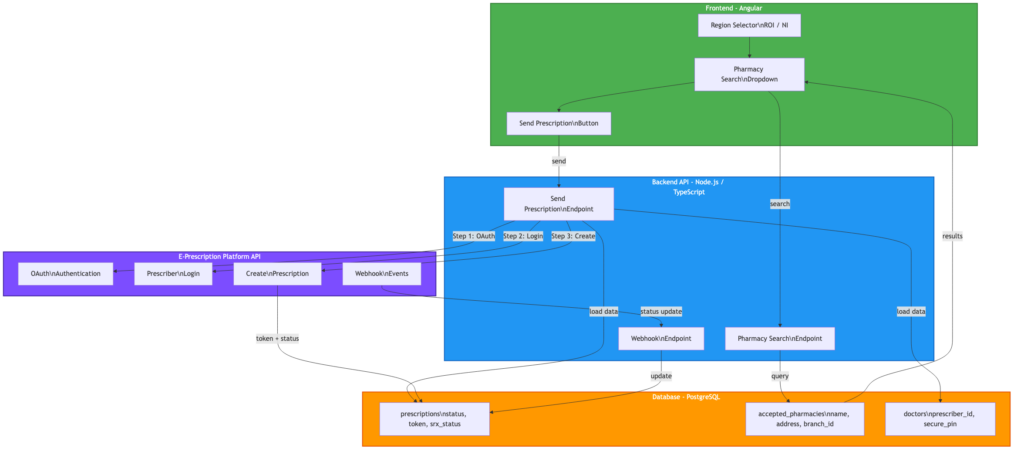
Technical Architecture
The integration involves four main components:
- Patient Frontend (Angular) — region selector, pharmacy search dropdown with address display, send button
- Backend API (Node.js / TypeScript) — handles authentication, builds the prescription payload, manages webhook events
- Third-Party E-Prescription API — processes the prescription, manages digital signatures, notifies pharmacies
- Database (PostgreSQL) — stores prescription status, tokens, and pharmacy data
The backend runs on AWS EKS (Kubernetes), with CI/CD through Bitbucket Pipelines. Environment variables are managed through Kubernetes secrets, injected from the CI/CD pipeline.
Key Challenges and Lessons Learned
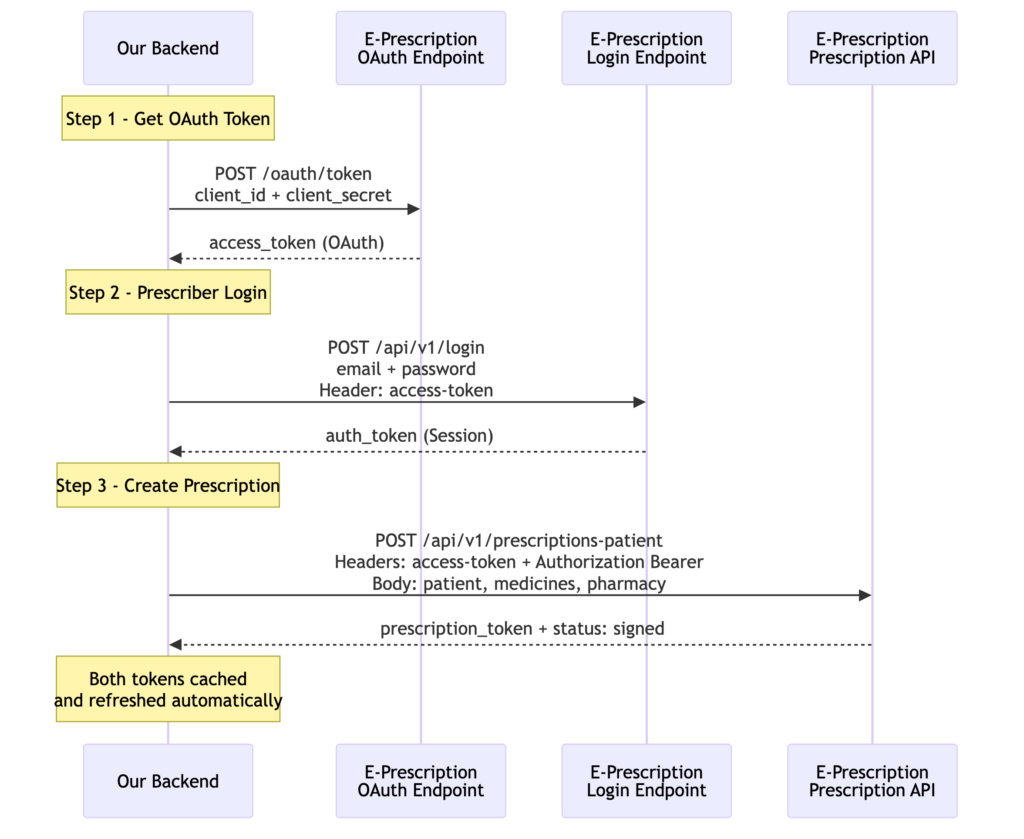
1. Two-Step Authentication
The third-party API uses a two-step authentication process:
- OAuth token — using client credentials (client ID + secret) to get an access token
- Prescriber login — using the access token + prescriber credentials to get a session token
Both tokens are needed for every API call. The backend caches them and refreshes automatically when they expire.
Lesson: Always check if a third-party API requires multiple authentication steps. Read the docs carefully — the login endpoint might need a token from a previous step.
2. Internal IDs vs Display IDs
The platform’s dashboard showed a clinic ID like 201334. But the API expected a different internal ID (994) for the same clinic. Using the dashboard ID caused an “unauthorized clinic” error.
This took days to debug because the error message was not clear, and the API documentation did not explain the difference between the two IDs.
Lesson: Never assume that the ID you see in a dashboard is the same one the API expects. When something fails with an “unauthorized” error, check if there is a different internal identifier.
Staging Environment Surprises
When testing the pharmacy dispensing flow on the staging environment, the third-party platform showed a pharmacy group selector with only two options: “All Other Pharmacies” and “Boots.” Our test pharmacy name did not appear anywhere.
This caused confusion — did we register the pharmacy incorrectly? Was the branch ID wrong?
It turned out this is just how their staging environment groups pharmacies. Our test pharmacy fell under “All Other Pharmacies” and everything worked fine after selecting that option.
Lesson: Staging environments are not miniature copies of production. They often have simplified data, different groupings, and fewer options. Do not panic when something looks wrong — verify with the third-party support team before assuming your integration is broken.
3. API Errors Returned as HTTP 200
The API returned errors with HTTP status code 200 (OK) but with success: false in the response body. Our code initially treated every 200 response as a success, so failed prescriptions were saved as “sent” in our database.
{
  "success": false,
  "message": "You trying to issue prescription to unauthorized clinic."
}
Lesson: Always check the response body for a success flag, not just the HTTP status code. Some APIs use 200 for everything and put the real status in the JSON body.
4. Response Structure Discovery
The API documentation did not clearly show the response structure for creating a prescription. We had to add temporary debug logging to capture the full response and find the correct path to the prescription token.
The token was nested deep in the response:
response.data.data.prescription.id
Not at the top level where we expected it.
Lesson: When integrating with a third-party API, expect to spend time discovering the actual response format. Add debug logging early, test with real calls, and remove the debug code before going to production.
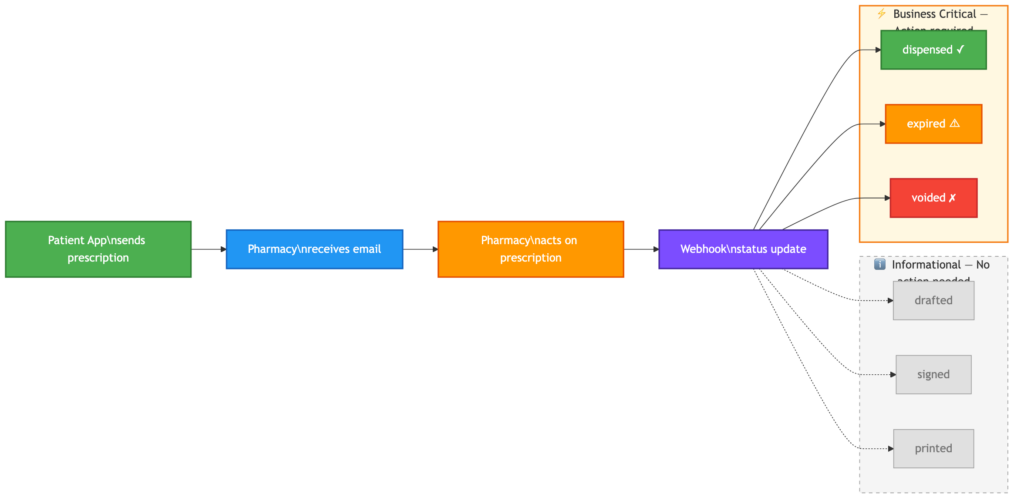
5. Webhook Integration
The platform supports webhooks to notify our system when a prescription status changes (signed, dispensed, expired, voided). Setting it up required:
- A publicly accessible HTTPS endpoint on our backend
- HMAC-SHA256 signature verification for security
- Returning a 2xx response immediately before doing any processing
The webhook allows us to track the full prescription lifecycle without polling the API.
Prescription Status Flow:
issued → signed → dispensed
                → expired (if patient does not collect)
                → voided (if cancelled)
Lesson: Implement webhooks early in the integration. They are essential for keeping your data in sync with the third-party platform.
What We Would Improve Next — Status History
Currently, each webhook update overwrites the previous status in our database. The prescription table has a single column (srx_status) that holds the latest value.
This means if a prescription goes from signed → printed → dispensed, by the time it reaches dispensed, we have no record that it was ever printed or when each transition happened.
For now this works — we care most about the final state. But for auditing, reporting, and customer support, a status history table that logs every webhook event with a timestamp would be valuable.
This is on our roadmap as a next improvement.
6. Don’t Change What Works
At one point, the integration was working perfectly. I made a change to “improve” the authentication header format — and it broke everything. Multiple hours were spent debugging something that was not broken before.
Lesson: If the integration works, do not refactor the API call format. Test any changes in isolation first before deploying. This applies especially to authentication headers — third-party APIs can be very specific about the exact format they expect.
Testing with Limited Resources
E-prescription integrations are tricky to test because:
- Each prescription uses a token — you cannot reset and resend the same prescription
- Staging environments may behave differently — credentials, clinic IDs, and permissions can differ between staging and production
- Manual steps are needed — creating test prescriptions in the database, seeding pharmacy data, setting up doctor credentials
We created SQL scripts to bulk-insert test prescriptions with medications, so we always had fresh ones available for testing.
What Needs to Exist Before the First Call
Before you can send a single prescription through the integration, several things need to be in place — and not all of them are on your side.
On the third-party platform:
- A registered prescriber (doctor) with verified credentials and a secure PIN
- A registered pharmacy as a contact, with a branch ID assigned by the platform On your side:
- The doctor’s prescriber ID and credentials stored in your database
- The pharmacy’s branch ID mapped in your accepted pharmacies table
- A patient with a valid profile (name, DOB, address)
- A prescription with medications ready to send, the patient does not need to exist on the third-party platform. Their details are sent as part of the prescription payload when the request is made. This distinction matters. If you assume everything is configured on your side and skip the third-party setup, your first API call will fail with a vague error — and you will spend hours looking in the wrong place.
The Stack
| Component | Technology |
|---|---|
| Patient Frontend | Angular |
| Backend API | Node.js, TypeScript, Express |
| Database | PostgreSQL, TypeORM |
| Infrastructure | AWS EKS (Kubernetes) |
| CI/CD | Bitbucket Pipelines |
| Container Registry | AWS ECR |
| Secrets | Kubernetes Secrets |
Results
After the integration:
- Patients can send prescriptions electronically to pharmacies in the new region
- Prescriptions are digitally signed and legally compliant
- Pharmacies receive instant email notifications with a secure dispensing link
- Our system tracks the full lifecycle: issued, signed, dispensed
- The existing email-based flow for the original region remains unchanged
The First Demo
Running the first end-to-end demo required more preparation than expected. It was not just about having the code ready — every piece of the puzzle needed to be in place.
What we needed:
- A doctor registered as a prescriber on the third-party platform with valid credentials
- A test patient with a complete profile in our system
- A pharmacy registered as a contact on the third-party platform with a branch ID
- Test prescriptions with medications created in our database
- The staging environment fully configured with API keys, webhook URLs, and secrets The demo walked through the full journey: sending a prescription from our platform, the pharmacy receiving the email notification, dispensing the
medication on the third-party portal, and our database updating automatically to “dispensed” via webhook. Seeing the full cycle complete for the first time — from send to dispensed — was a milestone. It confirmed that the integration works end-to-end and gave the team confidence to move forward with production planning.
Final Thoughts
Integrating with a third-party healthcare API is not just about writing code. It involves:
- Understanding their authentication model
- Discovering undocumented API behaviors
- Coordinating with their support team when things break
- Testing carefully with limited resources
- Being patient when things do not work as expected
The most important lesson: test in Postman before writing code, and do not change what already works.
Comments are closed